How to deploy Machine Learning models on Android and IOS with Telegram Bots
I’m sure, you have seen a demo of my Mask Detection Bot. If you haven’t, click play below.
I will describe step by step how you can do the same in a matter of minutes. But First why did I do this and how can this Mask detection bot be useful ?
Inspiration for this project#
I had the idea for this when I saw this tweet by Uber, introducing their mask verification feature for both drivers and riders:
Introducing, Mask Verification 😷🤳. If you get flagged for not wearing a mask, you’ll get our simple safety check before your next ride. pic.twitter.com/PmvzJHJ5Jw
— Uber (@Uber) September 24, 2020
Well, I wanted to do the same and reproduce the user experience, meaning, taking a photo in an app and have a mask detection response. Unfortunately, like most Data Scientists and Machine Learning Engineer, I don’t have Mobile apps creation skills. I thought about learning Flutter so i can deploy on both IOS and Android, but hey, I already have a list of skills to learn on my backlog. I’ve discovered later that you can create bots on Telegram for free and since Telegram is available on all mobile platforms and on windows, mac and linux as well, then it could be used to serve deep learning models.
So, what do we need for this project:
- Data : Images of people wearing masks and people not wearing masks
- Model: We will use Fastai v2 to train a model leveraging Transfert Learning
- Telegram account : obviously
- An Heroku account: For hosting
Let’s start.
Data#
I didn’t have to build a Dataset from scratch. I found this repo by Prajna Bhandary . She has already done the work. You can find the data in the experiments folder. 690 Images of people wearing mask are in a folder named “with_mask” and 686 Images of people not wearing mask in a folder named “without_mask”. That’s all we need. Let’s train a model.
Model Training with Fastai v2#
I’ve recently started learning fastai with the Deep Learning for coders book. So, this was an opportunity to practice my skills. Plus, Transfert Learning with fastai v2 is just 5 or 6 lines of code. But I could have done it with Tensorflow 2.0 too and get the same results. Let’s install fastai. It’s recommended to do it a conda environment. Install fastbook as well to get some utils files:
conda install -c fastai -c pytorch fastai
pip install -Uqq fastbook
Open a notebook and let’s import everything needed:
import fastbook
fastbook.setup_book()
from fastbook import *
from fastai.vision.all import *
Path to the data directory :
path = Path("../data")
Time to create a Dataloader. It’s just as simple as this. The datablock will get the images, use 20% of them for validation, get the labels just by taking the parent directory name and resize all images to 128*128*3
mask = DataBlock(
    blocks=(ImageBlock, CategoryBlock),
    get_items=get_image_files,
    splitter=RandomSplitter(valid_pct=0.2, seed=42),
    get_y=parent_label,
    item_tfms=Resize(128))
Let’s look at some of the images in the validation set:
dls = mask.dataloaders(path)
dls.valid.show_batch(max_n=10, nrows=2)
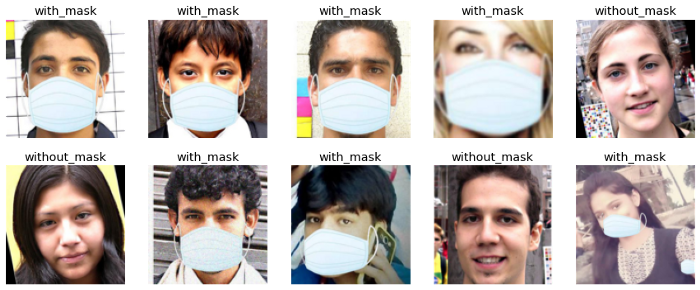
We can already see that some images where created by simply adding a mask to people’s faces. Good to know. We can now add some data augmentation steps and train our model with Transfert learning using a resnet18:
mask = mask.new(
    item_tfms=RandomResizedCrop(224, min_scale=0.5),
    batch_tfms=aug_transforms())
dls = mask.dataloaders(path)
learn = cnn_learner(dls, resnet18, metrics=error_rate)
learn.fine_tune(4)
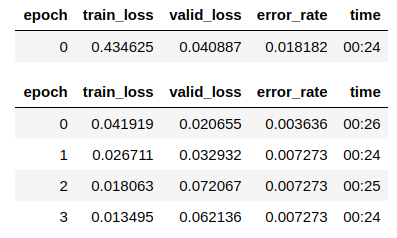
And just like that, in just 2 min on my local machine, we have a 99 % accuracy. How amazing is that! Let’s look at the confusion matrix:

Only 2 instances of people without mask misclassified as wearing mask. We can export this model and start writing code for our bot.
learn.export("model.pkl")
Telegram Bot to serve our model#
This is the fun part, and it is surprisingly so simple. To create a bot on Telegram, search BotFather on Telegram, sent this command : /newbot and it will ask your bot’s name and his username. Once you finish those steps, you will get a link to access your bot and a token which will be used in the code to interact with the it.
Something like this :
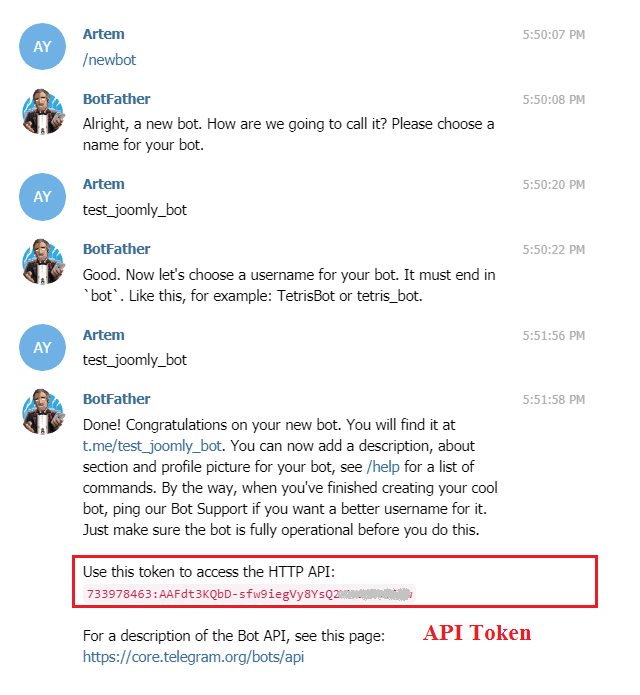
Go to your favorite code editor, Pycharm in my case, and let’s write the script for the bot.
We will be using the python-telegram-bot library. Install with :
pip install python-telegram-bot
Imports of libraries as usual with fastai for model loading:
import logging
from telegram.ext import Updater, CommandHandler, MessageHandler, Filters
from fastai.vision.all import load_learner
All telegram bots must define a function for specials commands /start and /help.
def start(update, context):
    update.message.reply_text(
        "Bot by @kevindegila on Twitter \n\n "
        "EN : Just send me a photo of you and I will tell you if you're wearing a mask 😏 \n"
        "FR : Envoie moi une photo de toi et je te dirai si tu portes un masque 😏"
    )


def help_command(update, context):
    update.message.reply_text('My only purpose is to tell you if you are wearing a mask. Send a photo')
As you can see, these functions take an update and a context as input and send text to the bot using the update.message.reply_text() function. An instance of the Updater class receive the commands and messages entered by users, forward them to a dispatcher which gives the messages to different handlers:
def main():
    updater = Updater(token="token", use_context=True)
    dp = updater.dispatcher
    dp.add_handler(CommandHandler("start", start))
    dp.add_handler(CommandHandler("help", help_command))
    updater.start_polling()
    updater.idle()
if __name__ == '__main__':
    main()
At this step, you can run your bot by running the script and send message for the special commands. Let’s add the mask detection feature. We will define a function to load our model, another function for when we receive images from users, and pass thi function to a Message handler with filters for images:
def load_model():
    global model
    model = load_learner('model/model.pkl')
    print('Model loaded')
def detect_mask(update, context):
    user = update.message.from_user
    photo_file = update.message.photo[-1].get_file()
    photo_file.download('user_photo.jpg')

    label = model.predict('user_photo.jpg')[0]
    if label == "with_mask":
        update.message.reply_text(
            "EN: Looks like you are wearing a mask 😷. I hope you don't forget it when going out!😉 \n\n"
            "FR: On dirait que tu portes un masque 😷, J'espère que tu ne l'oublies pas quand tu sors! 😉"
        )
    else:
        update.message.reply_text(
            "EN: Looks like you are not wearing a mask 😷. Please wear one and stay safe 🙄\n\n"
            "FR: On dirait que tu ne portes pas un masque 😷. S'il te plait, va en porter un. Fais attention 🙄"
        )
You can see how we download images and pass it our model and get the label with label = model.predict(‘user_photo.jpg’)[0]. We just send different messages based on which label is predicted.
Our main function now look like this:
def main():
    load_model()
    updater = Updater(token="token", use_context=True)
    dp = updater.dispatcher
    dp.add_handler(CommandHandler("start", start))
    dp.add_handler(CommandHandler("help", help_command))

    dp.add_handler(MessageHandler(Filters.photo, detect_mask))

    updater.start_polling()
    updater.idle()
That’s it for our bot. Everything is ready and it should work on your laptop. Now, let’s deploy it on heroku for free.
Deploying Telegram Bot on Heroku#
Go to https://www.heroku.com/ and sign up if you don’t already have an account. Second step is to go to your https://dashboard.heroku.com/ to create a new app by clicking on the new button:
Once your app is created, you need to create 3 special files is your project folder:
- A file named Procfile to tell Heroku how to run your code:
worker: python main.py
-
A file named runtime.txt to tell Heroku which version of Python to install:
python-3.7.0 -
A file named requirements.txt to tell heroku to install some libraries. Here we install the cpu version of Pytorch to avoid exceeding the slug size of 500Mb on Heroku. Make sure to set fastai to the same version you trained your model with:
python-telegram-bot
-f https://download.pytorch.org/whl/torch_stable.html
fastai==2.0.13
torch==1.6.0+cpu
torchvision==0.7.0+cpu
Now you just need to do this next steps to have your bot hosted and available at all time:
- Create a repo and commit all your files to master
- Write the heroku login command to connect to your Heroku account
- Add heroku as a distant repo with heroku git:remote -a app_name with app_name being your app name on heroku
- Deploy by pushing your code to Heroku with :
git push heroku master
That’s it. You can check if everything is working by testing on telegram and seeing the logs with heroku logs — tail .
Few considerations about Ethics#
Here are few things worth considering when creating a project like this one :
-
About the model : Does it recognize mask on all colors of skin, on all genders ? You mush check for biases before deploying this kind of model.
-
About the bot : Should it saved user images ? Have they accepted the collection of their data? In my case I don’t keep images for this bot. If I did I would exceed the slug size anyway. For more information about Ethics in AI, check this course by fast.ai : https://ethics.fast.ai/
Conclusion#
In this project we created a telegram bot which can tell if user’s are wearing mask on their photo or not. We train the model with fastai v2 and leveraging transfert learning. The bot was created using the python-telegram-bot library and we deployed our bot on Heroku so that our bot can be available at any time.
Feedbacks and questions are also welcome on twitter @kevindegila.